Chapter 15 – Setting Up A Virtual Environment
Setting Up a Virtual Environment
The first step in setting up a virtual environment is to select the virtualization technology you will use. A number of products, both free and paid, are available. Vendors such as VMware, Microsoft, Parallels, Citrix, and Oracle all have several virtualization offerings. Some solutions require dedicated hosts, which is not ideal. We prefer to use VMware Workstation, because it provides a good balance between useful features and cost. Particularly, the ability to create and restore “snapshots,” as well as configure multiple isolated virtual networks, is very convenient. Oracle’s VirtualBox is a good free option. It doesn’t have as many nice features as VMware, but it’s constantly improving. Because technology changes over time, here are some general considerations to keep in mind when selecting and configuring a virtual environment:
- Support for both modern and old versions of operating systems.
- Support for different architectures (for example, x86 and ARM).
- Support for a snapshot concept, so changes can easily be reverted.
- Protection mechanisms, so infected VMs cannot cause damage outside of the virtual environment, such as isolated networking.
- Convenience features, such as easy methods to transfer files between host and guest. Keep in mind that you should only use such features while the machine is in a clean state.
The rest of this section discusses the setup of a virtual environment using VMware Workstation.
Installing VMware
At this time we wrote this book, VMware Workstation was at version 9. This version was a major update from previous versions, and provides a much better virtual environment experience. You can purchase and download VMware Workstation directly from VMware’s website.
www.vmware.com/products/workstation/overview.html
The installation process is straightforward; simply run the setup file, select a “typical” install, and click through the following screens. The default settings should be fine for most people. If you already have VMware Player or Server installed on your system, the Workstation setup process will require uninstalling them first. After installing or uninstalling VMware products, you may be required to reboot your system.
Creating an Analysis Virtual Machine
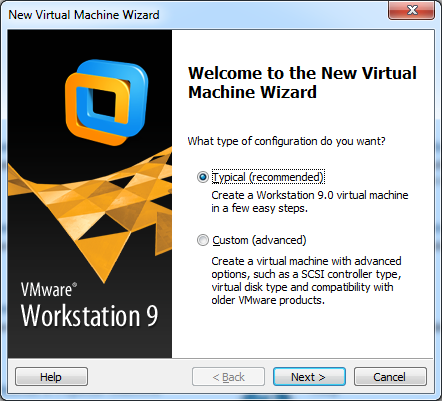
Once you have VMware Workstation installed and operational, you can begin creating a new virtual machine. When you start VMware Workstation version 9, the initial screen has a number of large icons you can click, including Create a New Virtual Machine. Click that icon to begin creating a new virtual machine. The process uses a wizard to step you through the necessary actions to create a new VM. The first step asks if you want to configure a “typical” or “custom” VM. Select Typical, as shown below, because initially the VM will need to have Internet access for setup and configuration.
In the next step, you must specify where the installation media is for the operating system you would like to install in the VM. We use Microsoft Windows XP as our standard malware-analysis platform. Browse to the CD-ROM drive or ISO image containing the installation disk for the operating system. In some cases, such as with Windows XP, VMware Workstation detects the operating system and streamlines the installation process. In the case of Windows XP, VMware Workstation will ask you for information required to perform a fully automated install of the operating system, such as the product key and the default username and password you want created. Enter in all of your information and allow the installation process to complete.
NOTE: You may be wondering why we prefer Windows XP as our analysis platform, and whether you can use something different. The main reason we use Windows XP is that there are many useful tools readily available, and it provides great compatibility and flexibility. But there is no reason you could not use another operating system, such as Linux. A number of the tools and techniques outlined in this chapter are not operating system specific. Be aware, though, that you will likely run into limitations with the type of analysis you can perform. For example, it would probably be difficult to perform dynamic analysis of a Win32 PE on Linux. Additionally, some malware will only run correctly on specific operating system versions. For example, a 32-bit version of Microsoft Windows 7 may be necessary to effectively perform analysis.Once the installation completes, you’re ready to begin configuring the VM. There are four areas to address:
- VMware tools First, be sure VMware tools are installed in Windows XP. The streamlined installation process should have automatically installed them, but it’s a good idea to double-check. You should see a grey “VM” icon in the Windows XP system tray. The tools provide a number of performance enhancements and usability features, such as the ability to drag and drop files between the VM and your host operating system. In some cases, VMware tools may interfere with analysis. It’s a good idea to have a copy of the virtual machine that does not have VMware tools installed.
- OS patches Once you have VMware tools installed, you should install all current patches for the OS. You will likely have to reboot and visit Windows Update multiple times to install all current updates. One “update” we tend to avoid installing in Windows XP is the “Windows Search” feature.
- Triage software Install the malware triage applications and tools you will use. The easiest way to install new software is to drag and drop the installation files between your host operating system and the VM. Also, some software we specifically avoid installing in the analysis VM. For example, antivirus or other security software is not needed and may interfere with malware analysis. In most cases, you will want to disable or even uninstall security-related products. Also, be very careful where you download tools from—you may inadvertently download malware.
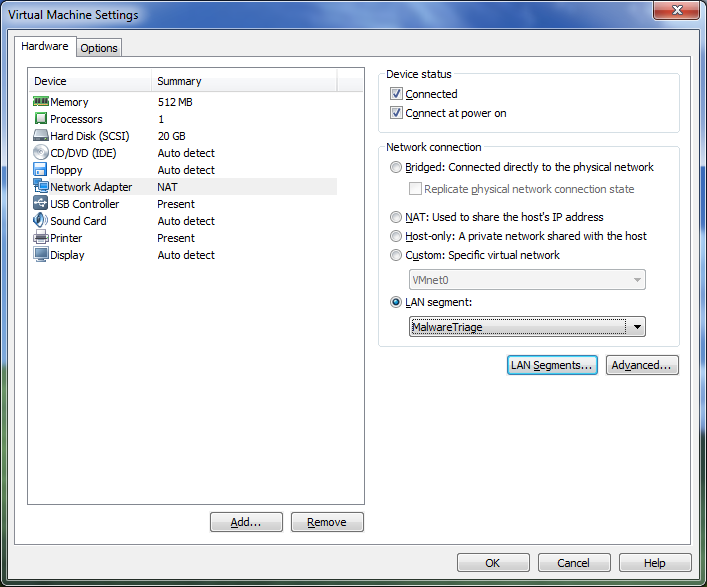
- Network configuration Finally, shut down the VM and configure the network card to be connected to a “LAN segment.” A VMware “LAN segment” is a virtual LAN segment that is isolated from all other networks, both virtual and physical. There are no LAN segments by default, so you will need to add one and assign it to the VM. Choose a descriptive name, such as “MalwareTriage,” so that it’s obvious what this LAN segment is used for. Note that, unlike VMware virtual networks (VMNet0-9), LAN segments do not have any services, such as DHCP, by default. If you require DHCP or other services, you should install an additional VM dedicated to that.
Once you get everything configured and ready to go, you might be excited to put your shiny new virtual machine to use. We suggest that you do one last thing while it’s still in a pristine clean state—create a snapshot. After you create a snapshot, consider preserving your virtual machine (snapshot and all) to external media, preferably something read-only like a DVD, and include a checksum with it. In the next section, we cover what snapshots are, why it’s a good idea to create one, and how to get started.
Snapshots
VMware Workstation allows you to create what are called “snapshots” of a virtual machine. A snapshot saves the complete state of the virtual machine—memory, hard drive, CPU—as a kind of checkpoint, or bookmark. You can create multiple snapshots at different points in time, assign each one a name, and select one to restore. Snapshots are persistent; once you create one, it remains available to restore until you delete the snapshot. This feature is perfect for preserving a known clean state of the virtual machine. You can then use the snapshot to return the VM to a clean state before each triage session. Being able to restore a snapshot also makes it easy to perform tests that modify the VM in ways that might cause issues—you can easily go back to a clean, working state, or just rewind to an earlier point in time.
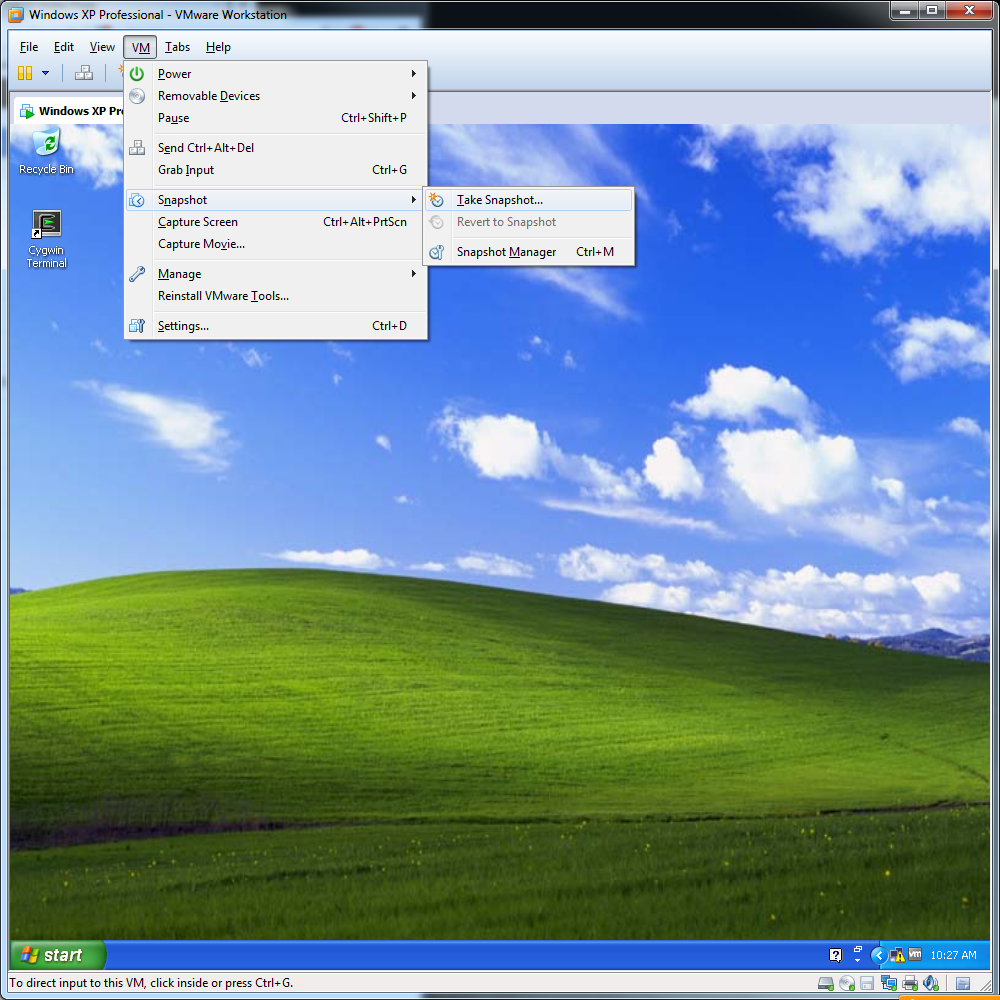
Creating and using snapshots is easy. You can create a snapshot while the VM is running or powered down. If you are ready to create a snapshot, select VM from the title bar menu, navigate to the Snapshot option, and click Take Snapshot (see below). Fill in an appropriate name so that you can tell what each snapshot was for, and click OK. VMware Workstation will then create the snapshot.
Once a snapshot is created for a VM, you can restore it through the same menu—you will see a list of available snapshots below the Take Snapshot option, as shown below. Click the snapshot name, and VMware Workstation will restore that snapshot. The snapshot may take a few minutes to restore, depending on how many changes occurred since that snapshot.

If you are wondering when might be a good time to take a snapshot, here are a couple of situations to consider. During the course of triaging malware, you may come to a decision point that you might want to quickly reevaluate with a different choice. Or perhaps you have just painstakingly configured the VM to properly run a piece of malware. If you are in either of those situations, it’s probably a good idea to take a snapshot. Don’t worry about taking too many snapshots—you can easily delete them by selecting the snapshot from within the snapshot manager and selecting Delete.
Transferring Files
A nice feature of VMware Workstation is the ability to drag and drop files into and out of a VM. You can imagine the VMware Workstation window as a Windows Explorer window—just drag files from your malware storage location on your host system directly over to the Windows XP desktop in the VM, and vice versa. This is the normal method we use to transfer files, including software installation packages and suspected malware, between the VM and the host system. You can also use this method to move the results of your analysis from the triage VM to your host system.
Caution: Remember to be careful about what files you drag and drop out of a VM and where you store them. Output from malware could be malicious in some way, so you should handle the output as malware unless you are sure it’s safe.
Now that you’ve set up an environment, we can get down to business—triaging the suspected malware. Static and dynamic analysis are the two types of malware triage analysis methods we will cover. In the following sections, we cover the basics of using each of these two methods. Be sure to familiarize yourself with both methods, because sometimes one yields much better results than the other.